Have you ever wondered how doctors spot life-threatening conditions like pneumothorax or pneumonia on a seemingly simple black-and-white chest image? The ability to accurately perform chest x-ray interpretation is one of the most critical skills that separates confident clinicians from anxious medical students. Whether you’re an MBBS student preparing for clinical exams, a junior doctor building diagnostic confidence, or simply someone curious about how medical imaging works, mastering the systematic approach to reading chest radiographs will transform how you understand respiratory and cardiac pathology.
Chest radiography remains the most commonly ordered imaging study worldwide, with over 70 million chest X-rays performed annually in the United States alone. Despite advances in CT and MRI technology, the humble chest X-ray continues to be the first-line investigation for countless respiratory, cardiac, and thoracic conditions. Studies show that medical students and junior doctors often struggle with chest x-ray interpretation, with accuracy rates as low as 40% when clinical history is absent. This comprehensive guide will equip you with the systematic tools, clinical pearls, and confidence-building strategies you need to excel at chest x-ray interpretation in both academic and real-world settings.
What is Chest X-Ray Interpretation?
Chest x-ray interpretation is the systematic process of analyzing a chest radiograph to identify normal anatomical structures and detect pathological abnormalities affecting the thorax. According to standard radiology textbooks like “Felson’s Principles of Chest Roentgenology,” chest radiograph interpretation involves evaluating the lungs, heart, mediastinum, pleura, bones, and soft tissues using a structured approach that minimizes the risk of missing critical findings.
The process requires understanding basic radiographic principles: Chest X-rays are a form of electromagnetic radiation that pass through the body differently depending on tissue density. Dense structures like bones and the heart appear white (radiopaque), while air-filled lungs appear black (radiolucent). This density difference allows visualization of anatomical structures and pathological processes. The systematic approach to chest x-ray ensures that every component is evaluated methodically, preventing satisfaction of search bias where finding one abnormality causes you to stop looking for others.
Modern chest x-ray interpretation follows evidence-based protocols that have been refined over decades of clinical practice. The most widely adopted method is the ABCDE approach combined with preliminary quality assessment using the RIPE criteria. This standardized framework has been validated in multiple studies and is recommended by major radiology organizations including the American College of Radiology and the Royal College of Radiologists.
Why Chest X-Ray Interpretation Matters
Clinical Significance
The ability to perform accurate chest x-ray interpretation directly impacts patient outcomes across multiple specialties. Emergency physicians rely on chest x-ray interpretation to identify life-threatening conditions like tension pneumothorax, massive pleural effusion, and acute heart failure within minutes of patient arrival. Pulmonologists use chest radiographs to track disease progression in conditions like tuberculosis, COPD, and interstitial lung disease. Surgeons depend on post-operative chest X-rays to confirm correct placement of central lines, endotracheal tubes, and chest drains.
For medical students, competency in chest radiograph interpretation is essential for:
- Passing clinical exams (USMLE Step 2 CK, PLAB, medical school OSCEs)
- Building diagnostic reasoning skills
- Communicating effectively with radiologists and consultants
- Providing quality patient care during clinical rotations
healthcare professionals, strong chest x-ray interpretation skills mean:
- Faster diagnosis in time-critical emergencies
- Reduced unnecessary CT scan orders
- Better patient counseling and shared decision-making
- Enhanced professional confidence and competence
general public understanding, learning basic principles helps:
- Understanding your own medical reports
- Making informed healthcare decisions
- Communicating better with healthcare providers
- Recognizing when urgent medical attention is needed
Economic and Healthcare Impact
Chest X-rays are cost-effective compared to advanced imaging, costing approximately $50-150 in the US versus $500-3000 for chest CT scans. Accurate initial interpretation reduces unnecessary follow-up imaging, decreases healthcare costs, and minimizes radiation exposure. Studies estimate that improving chest x-ray interpretation accuracy by just 10% could save the US healthcare system over $2 billion annually through reduced misdiagnosis and inappropriate treatments.
Read More : Diabetic Ketoacidosis: Diagnosis, Management Protocols & Prevention
Systematic Approach to Chest X-Ray Interpretation
Successful chest x-ray interpretation requires a consistent, methodical approach every single time. The most comprehensive framework combines the DRS-ABCDE method, where you first check technical quality before diving into anatomical assessment.
Step 1: DRS – Details, Rotation, Inspiration (RIPE), Projection
Before analyzing any chest X-ray, you must verify technical quality using what many radiologists call the “DRS” preliminary check:
D – Details (Patient Identification)
Always start by confirming:
- Patient name and date of birth – Ensure you’re reviewing the correct patient’s imaging
- Date and time of examination – Critical for comparing with previous studies
- Side markers (R for right, L for left) – Usually placed on the patient’s right side
- Previous imaging – Compare with old films when available to detect changes
This simple verification prevents medication errors, wrong-patient procedures, and medicolegal issues. In busy clinical settings like emergency departments, taking 5 seconds for proper identification has prevented countless patient safety incidents.
R – RIPE Quality Assessment
The RIPE mnemonic evaluates technical quality:
R = Rotation: The chest X-ray should be taken with the patient facing straight ahead. Check if:
- The medial ends of both clavicles are equidistant from the spinous processes of the vertebrae
- If rotation is present, the lung on the side rotated toward the X-ray beam appears smaller and whiter
- Significant rotation can mimic mediastinal shift or cardiac enlargement
I = Inspiration: Adequate inspiratory effort is crucial. Good inspiration shows:
- 5-6 anterior ribs visible above the diaphragm (counted where ribs cross the diaphragm in the mid-clavicular line)
- 9-10 posterior ribs visible (counted along the lateral chest wall)
- If fewer ribs are visible, describe it as “reduced lung volumes” rather than “poor inspiratory effort”
- Inadequate inspiration can mimic basal consolidation or cardiac enlargement
P = Penetration (Exposure): Correct exposure allows proper tissue visualization:
- You should barely see the vertebral bodies through the cardiac silhouette
- The intervertebral disc spaces should be just visible behind the heart
- Under-penetrated films appear too white, making everything look more opaque
- Over-penetrated films appear too black, potentially hiding pathology
E = Everything/Entirety: Ensure the entire thorax is included:
- Both lung apices visible above the clavicles
- Both costophrenic angles visible at the bases
- Lateral chest walls included bilaterally
This chest x-ray quality check takes only 15-20 seconds but dramatically improves diagnostic accuracy.
S – Projection Type
Understanding projection affects interpretation:
PA (Postero-Anterior) View:
- X-ray beam travels from back to front
- Patient stands upright, chest against the detector
- Standard view for ambulatory patients
- Heart is closer to the detector, minimizing magnification
- Cardiothoracic ratio is accurate (heart diameter should be <50% of thoracic diameter)
AP (Antero-Posterior) View:
- X-ray beam travels from front to back
- Often portable, patient may be sitting or supine
- Used for critically ill or immobile patients
- Heart is magnified, making it appear larger
- Scapulae often overlie the lung fields
- Cannot accurately assess cardiomegaly on AP films
Understanding PA vs AP chest x-ray differences prevents misdiagnosis of cardiac enlargement and helps contextualize findings.
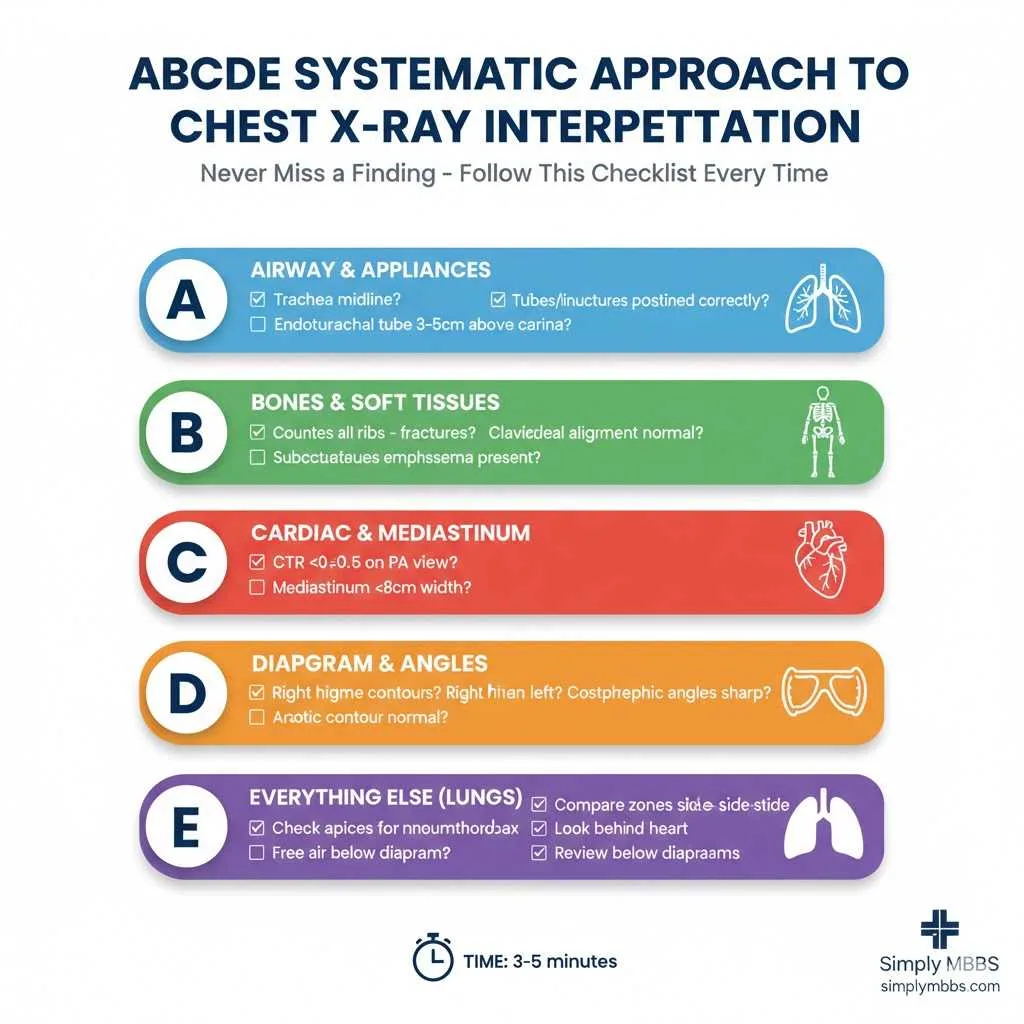
2: ABCDE Method – Systematic Anatomical Review
Once technical quality is confirmed, proceed with the ABCDE systematic review. This approach ensures comprehensive evaluation of all thoracic structures.
A = Airway and Appliances
Airway Assessment:
- Trachea: Should be midline, deviation indicates mass effect, tension pneumothorax, or volume loss
- Carina: The point where trachea bifurcates into main bronchi, visible at T4-T5 level
- Main bronchi: Right main bronchus is shorter, wider, and more vertical than left
- Hilar structures: The hila contain pulmonary arteries, veins, and main bronchi; should be symmetric and “comma-shaped”
Appliances and Foreign Bodies:
Modern medicine means chest X-rays often show lines and tubes on chest x-ray:
- Endotracheal tube (ETT): Tip should be 3-5 cm above the carina (approximately T4 level)
- Nasogastric tube (NGT): Should pass through esophagus, cross diaphragm, and end in stomach
- Central venous catheters: Tips should be in superior vena cava, not in right atrium
- Chest drains: Follow the pleural space, with tip positioned appropriately for effusion or pneumothorax
- Pacemakers and ICDs: Check lead positions and generator placement
- Cardiac valves: Prosthetic valves appear as metallic densities
Misplaced tubes can cause life-threatening complications, making this assessment critical.
B = Bones and Soft Tissues
Systematically evaluate the thoracic skeleton:
Bones to Assess:
- Ribs: Count them, look for fractures, lytic or sclerotic lesions
- Clavicles: Check for fractures, especially after trauma
- Scapulae: Assess alignment and integrity
- Spine: Look at visible thoracic vertebrae for alignment, fractures, or lytic lesions
- Sternum: Though difficult to see on PA views, check for sternal wires after cardiac surgery
Soft Tissues:
- Subcutaneous emphysema: Air in soft tissues appears as lucent streaks
- Breast shadows: Can mimic lower zone pathology in women
- Muscle wasting: May indicate chronic illness
- Cervical soft tissues: Visible at top of the film
Common bone pathology:
- Rib fractures (trauma, pathological)
- Vertebral compression fractures (osteoporosis, malignancy)
- Bone metastases (lytic or sclerotic lesions)
C = Cardiac Silhouette and Mediastinum
Cardiac Assessment:
The heart borders are formed by specific chambers:
- Right heart border: Right atrium
- Left lower heart border: Left ventricle
- Left upper heart border: Left atrial appendage and pulmonary trunk
Cardiothoracic Ratio:
On a PA chest X-ray, measure:
- Maximum cardiac width (widest point of the heart)
- Maximum thoracic width (internal rib cage diameter)
- Ratio = cardiac width ÷ thoracic width
- Normal: <0.5 (or <50%)
- >0.5 suggests cardiomegaly (though this is unreliable on AP films)
Mediastinal Structures:
- Superior mediastinum: Trachea, great vessels, thymus (in children)
- Middle mediastinum: Heart, pericardium, phrenic nerves
- Posterior mediastinum: Esophagus, descending aorta, thoracic duct
Mediastinal widening (>8 cm on PA film) suggests:
- Aortic dissection or aneurysm
- Lymphadenopathy
- Mediastinal masses (lymphoma, teratoma, thymoma)
- Vascular congestion
Understanding the approach to an unconscious patient requires recognizing cardiac and vascular emergencies on chest imaging.
D = Diaphragm and Costophrenic Angles
Diaphragm Assessment:
Normal diaphragm position:
- The right hemidiaphragm sits slightly higher than the left (due to the liver)
- Should be smooth, dome-shaped contours
- Normal position: 5th-6th anterior rib level on full inspiration
Elevated hemidiaphragm causes:
- Phrenic nerve palsy (trauma, surgery, lung cancer)
- Subphrenic abscess
- Hepatomegaly (right side)
- Gastric distension (left side)
- Volume loss in lower lobe
Flattened diaphragm:
- Hyperinflation (COPD, asthma)
- Diaphragm pushes below 6th anterior rib
- Loss of normal dome shape
Costophrenic Angles:
The angles where diaphragm meets chest wall should be sharp and well-defined. Blunting suggests:
- Pleural effusion (most common cause)
- Pleural thickening (previous infection, asbestos exposure)
Free air under diaphragm:
- Appears as a lucent crescent below the diaphragm on an erect film
- Indicates perforated viscus (peptic ulcer, bowel perforation)
- Medical emergency requiring surgical consultation
E = Everything Else (Lung Fields and Pleura)
This is where most pathology lives, requiring careful, systematic examination.
Lung Field Assessment:
Divide each lung into three zones (upper, middle, lower) and compare side-to-side:
Normal lung appearance:
- Should be relatively uniform black (radiolucent)
- Pulmonary vessels visible as branching white lines
- Vessels taper toward periphery
- Upper zones slightly darker than lower zones
Abnormal opacities (white areas):
- Consolidation: Air spaces filled with fluid/pus/blood
- Collapse/Atelectasis: Loss of lung volume
- Masses/Nodules: Discrete rounded opacities
- Interstitial patterns: Fine lines or reticular patterns
Abnormal lucencies (darker areas):
- Pneumothorax: Air in pleural space, absent lung markings
- Bullae: Air-filled spaces from emphysema
- Cysts: Thin-walled air-filled structures
Pulmonary vessels:
- Prominence suggests pulmonary hypertension or heart failure
- Oligemia (reduced vessels) suggests pulmonary embolism or emphysema
Key review areas (commonly missed pathology):
- Lung apices: Pneumothorax, apical TB, Pancoast tumors
- Behind the heart: Left lower lobe pathology often hidden
- Below the diaphragm: Subphrenic air, gastric bubble position
- Lung periphery: Peripheral pneumothorax, chest wall masses
This comprehensive “everything else” category requires the most practice and pattern recognition. Regular exposure to normal chest x-ray anatomy builds the foundation for recognizing abnormalities.
How to Read a Chest X-Ray: Practical Step-by-Step Guide
This step by step approach to chest x-ray interpretation consolidates everything into a clinical workflow:
Step 1: Patient Details & Clinical Context (30 seconds)
- Verify patient identity, date, markers
- Read the clinical indication/history
- Check for previous imaging
2: Technical Quality – RIPE Assessment (30 seconds)
- Rotation: clavicles equidistant from spine?
- Inspiration: 5-6 anterior ribs visible?
- Penetration: vertebrae faintly visible through heart?
- Entirety: complete thorax included?
3: Projection Confirmation (10 seconds)
- PA or AP view?
- Upright or supine?
- Adjust interpretation accordingly
4: Systematic ABCDE Review (3-5 minutes)
A – Airway (30 seconds)
- Trachea midline?
- Hilar structures symmetric?
- Any tubes/appliances? Positions correct?
B – Bones (30 seconds)
- Count ribs on both sides
- Clavicles, scapulae intact?
- Vertebral alignment normal?
- Soft tissue emphysema?
C – Cardiac (45 seconds)
- Heart size (CTR <50%)?
- Borders clear (silhouette sign)?
- Mediastinum width normal?
- Vascular pedicle normal?
D – Diaphragm (30 seconds)
- Smooth dome-shaped contours?
- Right slightly higher than left?
- Costophrenic angles sharp?
- “yoast-text-mark” & Free air present?
E – Everything Else (2-3 minutes)
- Compare lung zones systematically
- Check apices carefully
- Examine behind heart
- Look for pneumothorax at apices
- Assess pleural spaces
- Review area below diaphragms
5: Review Areas (30 seconds)
Go back and specifically check commonly missed areas:
- Lung apices
- Behind heart
- Costophrenic angles
- Below diaphragms
- Soft tissues
6: Compare with Previous Films (1-2 minutes if available)
- Changes over time often more significant than single findings
- Progressive changes indicate active disease
7: Formulate Impression (1 minute)
- Normal or abnormal?
- Specific findings identified?
- Differential diagnoses?
- Recommendations for further imaging?
Total time for systematic review: 5-7 minutes initially, improving to 3-5 minutes with practice.
This structured how to read a chest x-ray approach prevents missed findings and builds confidence.
Read More : Acute Myocardial Infarction (MI): ECG Changes, Early Treatment, and Post-MI Care
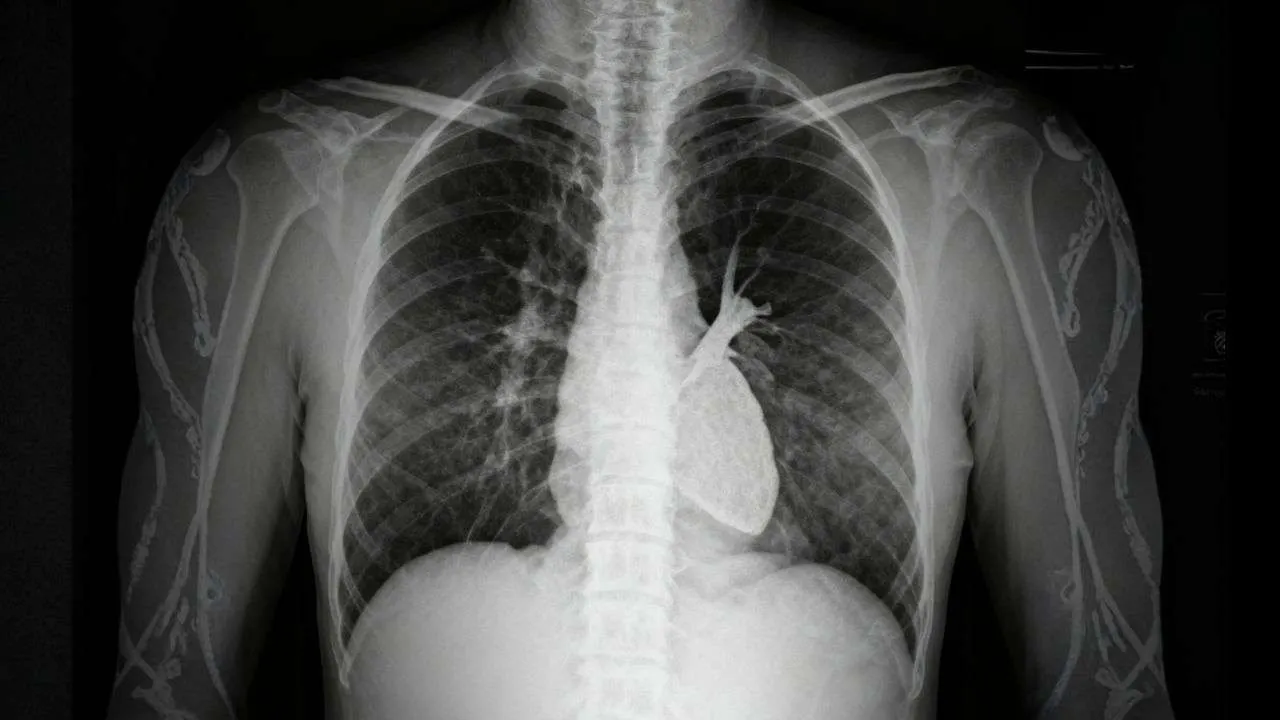
Normal Chest X-Ray Anatomy: What You Should See
Understanding normal chest x-ray anatomy is essential before identifying pathology. Let’s break down the key anatomical landmarks:
Mediastinal Structures
| Structure | Location | Normal Appearance |
|---|---|---|
| Trachea | Midline, T1-T4 | Dark air column, 15-20mm wide |
| Carina | T4-T5 level | Bifurcation point of trachea |
| Aortic arch | Left upper mediastinum | Prominent “aortic knob” |
| Right paratracheal stripe | Along right trachea | <3-4mm soft tissue line |
| Azygoesophageal recess | Right mediastinum | Smooth curved interface |
Cardiac Borders
The cardiac silhouette forms distinct borders:
- Right heart border: Right atrium (should be clearly visible)
- Left lower border: Left ventricle (largest chamber)
- Left upper border: Pulmonary artery and left atrial appendage
Hilar Anatomy
The hila (plural of hilum) contain:
- Main pulmonary arteries (majority of hilar density)
- Pulmonary veins
- Main bronchi (create lucency within hila)
- Lymph nodes (not usually visible unless enlarged)
Normal hilar characteristics:
- Left hilum sits 0.5-2.5 cm higher than right
- “Comma” or “bat-wing” shape
- Symmetrical density and size
- Width: 10-15mm at widest point
Lung Anatomy
Lobar anatomy:
- Right lung: Upper, middle, lower lobes (separated by horizontal and oblique fissures)
- Left lung: Upper and lower lobes (separated by oblique fissure only)
Fissures (when visible):
- Horizontal fissure: separates right upper from middle lobe
- Oblique fissures: separate upper/middle from lower lobes
Vascular markings:
- Pulmonary arteries: branch from hila, taper peripherally
- Should be visible in medial 2/3 of lung fields
- Peripheral 1/3 should be relatively avascular
Pleura and Diaphragm
Pleural spaces:
- Not normally visible (too thin)
- Become visible when thickened or fluid-filled
Diaphragm:
- Right: 5th anterior rib / 10th posterior rib level
- Left: Slightly lower
- Gastric bubble visible under left hemidiaphragm
Understanding thoracic anatomy and lymphatic drainage helps contextualize mediastinal pathology.
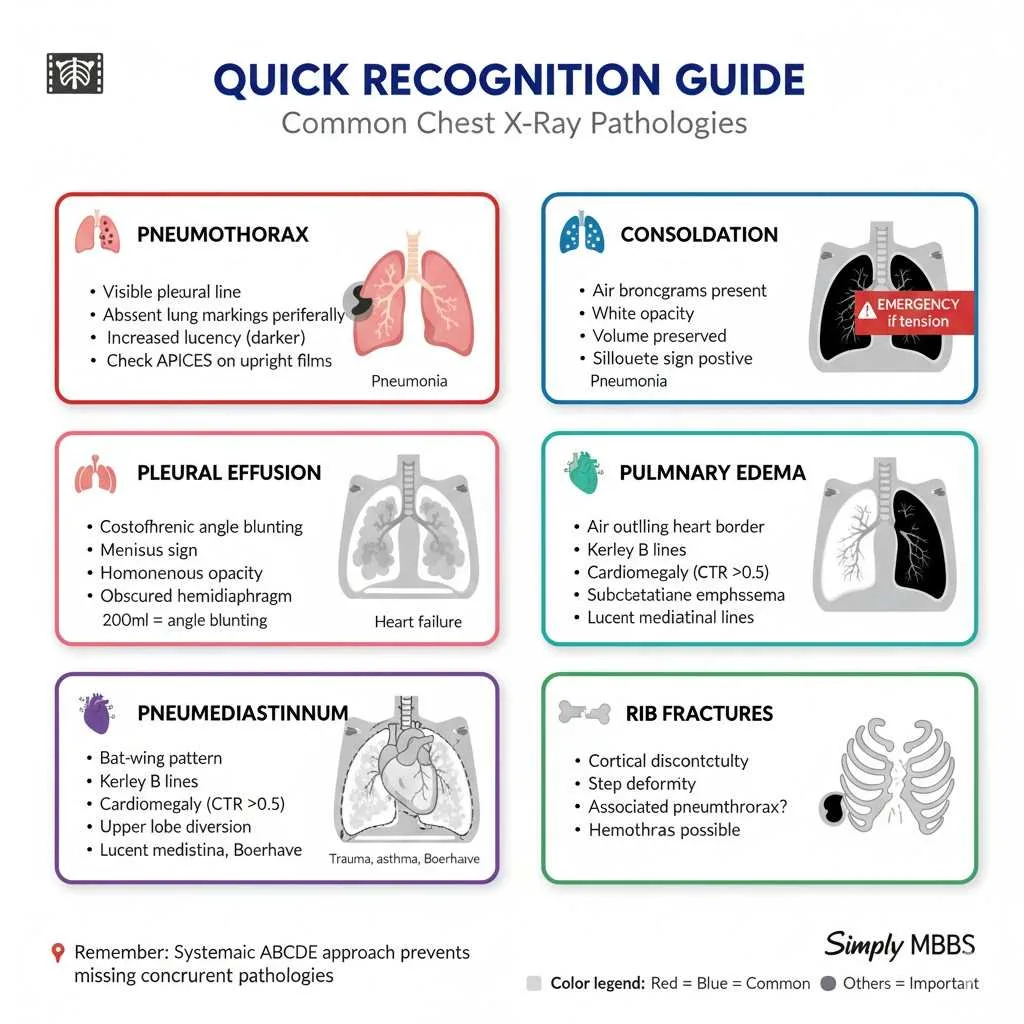
Common Chest X-Ray Interpretation Findings: Recognition Guide
Consolidation vs Atelectasis on X-Ray: Key Differences
One of the most challenging distinctions in chest x-ray interpretation is differentiating consolidation vs atelectasis on x-ray. Both appear as white (opaque) areas, but understanding their differences is crucial.
CONSOLIDATION:
Definition: Replacement of air in alveoli with fluid, pus, blood, or cells while maintaining normal lung volume.
Radiographic Features:
- Air bronchograms: Black branching airways visible within white consolidation (pathognomonic sign)
- Preserved lung volume: No shift of fissures or mediastinum
- Silhouette sign: Loss of adjacent structure borders (heart, diaphragm)
- Fluffy, ill-defined margins
- Homogeneous opacity
Common Causes:
- Pneumonia (bacterial, viral, fungal) – see pneumonia diagnosis and management for comprehensive coverage
- Pulmonary edema (cardiogenic or non-cardiogenic)
- Pulmonary hemorrhage
- Aspiration
- ARDS
Lobar Consolidation Patterns:
- Right middle lobe: Obscures right heart border
- Left upper lobe (lingula): Obscures left heart border
- Lower lobes: Obscure hemidiaphragms
ATELECTASIS (COLLAPSE):
Definition: Loss of lung volume due to airway obstruction, compression, or surfactant deficiency.
Radiographic Features:
- Volume loss signs:
-
-
Elevation of hemidiaphragm
-
Shift of mediastinum TOWARD collapsed lung
-
Crowding of ribs on affected side
-
Displacement of fissures toward collapsed area
-
- Triangular or wedge-shaped opacity
- Loss of aeration without air bronchograms (airways also collapsed)
- Compensatory hyperinflation of remaining lung
Common Causes:
- Mucus plugging (post-operative, asthma)
- Tumor obstructing bronchus
- External compression (enlarged lymph nodes, pleural effusion)
- Bronchial stenosis
- Foreign body aspiration
Types of Atelectasis:
- Lobar collapse: Entire lobe collapsed
- Segmental collapse: Specific bronchopulmonary segment
- Plate atelectasis: Linear horizontal lines (subsegmental)
COMPARISON TABLE:
| Feature | Consolidation | Atelectasis |
|---|---|---|
| Volume | Preserved | Reduced |
| Air bronchograms | Present | Usually absent |
| Mediastinal shift | None | Toward affected side |
| Diaphragm | Normal position | Elevated |
| Fissures | Normal | Displaced toward opacity |
| Margins | Fluffy, ill-defined | Sharp, wedge-shaped |
| Rib spaces | Normal | Crowded |
Clinical Tip: If you see air bronchograms with normal volume, think consolidation. If you see volume loss with mediastinal shift, think atelectasis.
Pneumothorax Recognition
Pneumothorax is air in the pleural space – one of the most critical findings not to miss.
Radiographic Signs:
- Visible visceral pleural line: Thin white line separated from chest wall
- Absence of lung markings peripheral to pleural line
- Hyperlucency (increased blackness) in affected area
- Deep sulcus sign (on supine films) – abnormally deep costophrenic angle
Where to Look:
- Lung apices (upright films) – air rises to highest point
- Lateral costophrenic angles (supine films) – air collects laterally when supine
Tension Pneumothorax Signs:
- Large pneumothorax with mediastinal shift AWAY from pneumothorax
- Flattened/inverted hemidiaphragm
- Medical emergency requiring immediate needle decompression
Pleural Effusion
Definition: Fluid in the pleural space.
Radiographic Signs:
- Blunting of costophrenic angle (first sign, visible with ~200ml fluid)
- Meniscus sign: Curved upper border of fluid
- Opacification of lower chest
- Loss of hemidiaphragm visibility
Volume estimates:
- Blunted costophrenic angle: ~200-500 ml
- Fluid to 4th rib posteriorly: ~1000 ml
- Complete opacification: ~2000-3000 ml
Lateral decubitus view: Fluid layers out along dependent chest wall, confirming it’s mobile (not loculated).
Pulmonary Edema
Cardiogenic pulmonary edema (heart failure):
- Cardiomegaly (CTR >0.5)
- Upper lobe blood diversion: Prominent upper lobe vessels
- Kerley B lines: Short horizontal lines at lung bases (thickened interlobular septa)
- Bat wing or butterfly pattern: Perihilar opacities
- Pleural effusions (often bilateral)
Common Mistakes to Avoid in Chest X-Ray Interpretation
Learning from common pitfalls improves accuracy. Here are the chest x-ray pitfalls and artefacts to watch for:
Technical Errors
1. Forgetting to check technical quality first
- Always use RIPE assessment before interpretation
- Poor technique mimics pathology (rotation mimics mediastinal shift)
2. Interpreting AP films like PA films
- Heart magnification on AP films causes false cardiomegaly
- Always note projection type in your interpretation
3. Not comparing with previous films
- A stable 3cm nodule for 5 years is likely benign
- New findings warrant investigation
Satisfaction of Search
4. Stopping after finding one abnormality
- Always complete full ABCDE systematic review
- Multiple pathologies often coexist (e.g., pneumonia AND pneumothorax)
Anatomical Blind Spots
5. Missing apical pneumothorax
- Air rises to apices on upright films
- Look carefully at lung apex above clavicles
6. Missing pathology behind the heart
- Left lower lobe pneumonia easily hidden
- Look for loss of left hemidiaphragm
7. Forgetting to check below the diaphragm
- Free air indicates perforation
- Assess gastric bubble position
8. Ignoring soft tissues and bones
- Subcutaneous emphysema indicates air leak
- Rib fractures may explain chest pain
Interpretation Errors
9. Mistaking consolidation for effusion
- Consolidation has air bronchograms
- Effusion blunts costophrenic angle with meniscus
10. Missing tension pneumothorax signs
- Mediastinal shift away from pneumothorax
- Requires immediate intervention
11. Over-calling cardiomegaly
- Must be on PA film for accurate CTR
- Patient positioning affects apparent heart size
12. Confusing artefacts with pathology
- Skin folds mimic pneumothorax
- Breast shadows mimic lower zone pathology
- Clothing buttons/snaps appear as nodules
Clinical Context Errors
13. Ignoring clinical history
- Clinical context dramatically improves accuracy
- Fever + cough + consolidation = pneumonia likely
14. Not recognizing life-threatening emergencies
- Tension pneumothorax, massive PE, aortic dissection
- Some findings require immediate action before detailed interpretation
Read More : Acute Kidney Injury (AKI): Clinical Classification, Urine Indices, and Management
Expert Tips for Medical Students: Mastering Chest X-Ray Interpretation
Building Pattern Recognition
Tip 1: Study normal anatomy extensively
- You can’t recognize abnormal without knowing normal
- Review 50-100 normal chest X-rays before studying pathology
- Focus on normal variations (prominent thymus in children, etc.)
2: Use the same systematic approach every time
- Consistency prevents missed findings
- Create a mental checklist: DRS-ABCDE
- Practice until it becomes automatic
3: Compare side-to-side constantly
- Asymmetry is always significant
- Compare hilar sizes, lung lucency, rib spacing
4: Practice with increasing difficulty
- Start with obvious pathology (massive pleural effusion)
- Progress to subtle findings (small pneumothorax)
- Eventually tackle complex cases with multiple findings
Clinical Integration
5: Always correlate with clinical scenario
- Trauma patient → look for rib fractures, pneumothorax
- Post-op patient → check line/tube positions
- Fever/cough → search for consolidation
6: Understand limitations
- Chest X-ray has ~70% sensitivity for pneumonia
- Some findings require CT for definitive diagnosis
- Know when to recommend additional imaging
Exam Preparation
7: Practice presenting findings formally
- “This is a PA chest radiograph of [patient details]…”
- “Image quality is adequate with good inspiration…”
- “The heart size is normal with a CTR of approximately 0.45…”
- “There is a right middle lobe consolidation with air bronchograms…”
8: Learn classic exam cases
- Pneumothorax
- Pleural effusion
- Lobar pneumonia
- Heart failure
- Pneumomediastinum
- Misplaced ETT
9: Use online resources
- Radiopaedia.org for case reviews
- Teaching files from medical schools
- Mobile apps for practice questions
Avoiding Burnout
10: Set realistic practice goals
- Review 5-10 chest X-rays daily rather than 100 weekly
- Consistency beats cramming
- Use spaced repetition for retention
Frequently Asked Questions (FAQs)
Q : How long does it take to learn chest x-ray interpretation?
A : Basic competency in chest x-ray interpretation typically requires 3-6 months of regular practice for medical students. Studies show that reviewing 200-300 chest radiographs with feedback significantly improves accuracy. However, true expertise develops over years of clinical practice. Start with mastering the systematic approach and normal anatomy, then gradually add pathology recognition. Daily practice of even 10-15 minutes reviewing chest X-rays accelerates learning more than occasional intensive study sessions.
Q : What is the ABCDE approach to chest x-ray interpretation?
A : The ABCDE approach is a systematic mnemonic ensuring comprehensive evaluation: Airway (trachea, hilar structures, tubes), Bones (ribs, clavicles, spine, soft tissues), Cardiac silhouette (heart size, borders, mediastinum), Diaphragm (contours, costophrenic angles, free air), and Everything else (lung fields, pleura, vessels). This method, combined with initial RIPE quality assessment, prevents missed findings and builds consistent interpretation habits. Using the same approach every time creates a mental checklist that becomes automatic with practice.
Q : What is the difference between PA and AP chest x-ray?
A : PA vs AP chest x-ray differences significantly affect interpretation. PA (posteroanterior) views have the X-ray beam traveling back-to-front with the patient upright against the detector, minimizing heart magnification and allowing accurate cardiothoracic ratio measurement. AP (anteroposterior) views use front-to-back beam direction, often portable for immobile patients, causing up to 15-20% cardiac magnification and unreliable cardiomegaly assessment. Always note projection type when interpreting chest radiographs, as AP films systematically overestimate heart size.
Q : How do you differentiate consolidation from atelectasis on chest x-ray?
A : Consolidation vs atelectasis on x-ray differentiation relies on volume assessment: consolidation maintains normal lung volume with air bronchograms visible (black airways in white opacity), while atelectasis shows volume loss with mediastinal shift toward affected side, elevated hemidiaphragm, crowded ribs, and usually absent air bronchograms. Consolidation suggests pneumonia, edema, or hemorrhage filling alveoli with preserved architecture. Atelectasis indicates collapse from airway obstruction or compression. The presence of air bronchograms strongly suggests consolidation rather than collapse.
Q : What are the RIPE criteria for chest x-ray quality?
A : RIPE criteria assess technical quality: Rotation (clavicles equidistant from spinous processes), Inspiration (5-6 anterior or 9-10 posterior ribs visible above diaphragm), Penetration/exposure (vertebrae faintly visible through cardiac silhouette), and Everything included (complete thorax from apices to costophrenic angles). Poor technical quality mimics pathology—rotation simulates mediastinal shift, inadequate inspiration resembles basal consolidation, and under-penetration makes everything appear abnormally white. Always perform chest x-ray quality check before clinical interpretation to avoid false-positive findings.
Exam Questions & Model Answers (University Pattern)
Question 1: Short Answer Question (10 Marks)
Stem: A 25-year-old male presents to emergency department with sudden onset right-sided chest pain and shortness of breath. Chest X-ray shows a visible pleural line in the right apex with absence of lung markings peripherally.
a) What is the most likely diagnosis? (2 marks)
b) List 4 radiographic features you would look for to assess severity. (4 marks)
c) What additional radiographic sign would indicate this is a tension pneumothorax? (2 marks)
d) Name 2 risk factors for spontaneous pneumothorax. (2 marks)
Model Answer:
a) Right-sided pneumothorax (2 marks)
b) Radiographic severity features: (1 mark each, any 4 of the following)
- Size of pneumothorax (measure rim of air between lung edge and chest wall)
- Complete vs. partial lung collapse
- Presence of mediastinal shift
- Position of trachea (deviation)
- Hemidiaphragm position (flattening or inversion)
- Subcutaneous emphysema
c) Mediastinal shift away from the pneumothorax (toward the left side) (2 marks)
-
Alternate answer: Contralateral tracheal deviation, depressed hemidiaphragm on affected side
d) Risk factors (1 mark each, any 2):
- Tall, thin male body habitus (Marfan syndrome)
- Smoking history
- Underlying lung disease (emphysema, asthma, cystic fibrosis)
- Previous pneumothorax
- Connective tissue disorders
Viva Tips:
- Emphasize tension pneumothorax is a clinical diagnosis requiring immediate needle decompression
- Discuss British Thoracic Society guidelines for pneumothorax management
- Mention CT is more sensitive than chest X-ray for small pneumothoraces
2: OSCE Station – Chest X-Ray Interpretation (15 Marks)
Clinical Scenario: You are shown a PA chest radiograph of a 68-year-old woman with 3-day history of fever, productive cough, and dyspnea.
Task: Present your systematic interpretation of this chest X-ray.
Model Answer Structure:
Introduction (2 marks):
“This is a PA chest radiograph of [patient name], a 68-year-old female, taken on [date]. The clinical indication is fever and productive cough.”
Technical Quality (2 marks):
“Assessing image quality using RIPE criteria: Rotation is adequate with clavicles equidistant from spinous processes. Inspiration is adequate with 6 anterior ribs visible above the right hemidiaphragm. Penetration is appropriate with vertebrae faintly visible through the cardiac silhouette. The entire thorax is included from apices to costophrenic angles.”
Systematic Review (8 marks – must use ABCDE):
A – Airway: “The trachea is central with no deviation. Hilar structures appear symmetrical. No appliances or foreign bodies are visible.”
B – Bones: “The bony thorax is intact with no fractures visible. Rib spacing is symmetrical. Vertebral alignment appears normal. No soft tissue emphysema.”
C – Cardiac: “The cardiac silhouette size is normal with cardiothoracic ratio approximately 0.45. The heart borders are clearly defined. The mediastinum is not widened.”
D – Diaphragm: “The right hemidiaphragm is at the level of the 5th anterior rib. Both hemidiaphragms have smooth contours. The costophrenic angles are sharp bilaterally. No free air is visible below the diaphragm.”
E – Everything Else: “There is a right lower zone consolidation with obscuration of the right hemidiaphragm, indicating right lower lobe involvement. Air bronchograms are visible within the opacity. The left lung field appears clear. No pleural effusion or pneumothorax is identified.”
Impression (2 marks):
“This chest X-ray shows right lower lobe pneumonia in keeping with the clinical presentation.”
Management Plan (1 mark):
“Recommend clinical correlation, sputum culture, blood cultures, and appropriate antibiotic therapy according to local guidelines.”
Quick Diagram Prompt:
Simple sketch showing: Right lung with shaded right lower zone, air bronchograms marked, right heart border visible, obscured right hemidiaphragm.
3: MCQ Style (Each 1 Mark) – 5 Questions Total
Q3.1: Which structure forms the right heart border on a PA chest radiograph?
a) Right ventricle
b) Right atrium ✓
c) Superior vena cava
d) Right pulmonary artery
Q3.2: What is the normal cardiothoracic ratio on a PA chest X-ray?
a) <0.3
b) <0.4
c) <0.5 ✓
d) <0.6
Q3.3: Air bronchograms are characteristically seen in:
a) Pneumothorax
b) Pleural effusion
c) Pulmonary consolidation ✓
d) Emphysema
Q3.4: On an adequately inspired PA chest radiograph, how many anterior ribs should be visible above the diaphragm?
a) 3-4
b) 5-6 ✓
c) 7-8
d) 9-10
Q3.5: Which sign indicates tension pneumothorax?
a) Mediastinal shift toward affected side
b) Mediastinal shift away from affected side ✓
c) Bilateral hilar enlargement
d) Air bronchograms
Last-Minute Exam Checklist
Pre-Exam Review (15 minutes before exam):
✓ RIPE quality criteria
✓ ABCDE systematic approach order
✓ PA vs AP differences (CTR only on PA)
✓ Air bronchogram definition (consolidation not collapse)
✓ Silhouette sign (RML = right heart border, Lingula = left heart border, lower lobes = hemidiaphragms)
✓ Pneumothorax signs (apices, visible pleural line)
✓ Tension pneumothorax (shift away + clinical emergency)
✓ Normal CTR <0.5
✓ 5-6 anterior ribs or 9-10 posterior ribs for adequate inspiration
✓ Consolidation vs atelectasis differences
Common Exam Cases to Know:
- Pneumothorax (especially apical)
- Lobar pneumonia with air bronchograms
- Pleural effusion with costophrenic angle blunting
- Pulmonary edema (bat-wing, Kerley B lines)
- Pneumomediastinum
- Misplaced NG tube or ETT
- Rib fractures
- Free air under diaphragm
Conclusion: Mastering the Art of Chest X-Ray Interpretation
Chest x-ray interpretation is a foundational clinical skill that bridges basic sciences, radiology, and patient care. By adopting a systematic approach combining technical quality assessment (RIPE) with comprehensive anatomical review (ABCDE), medical students and healthcare professionals can achieve diagnostic accuracy comparable to experienced radiologists. Studies consistently demonstrate that structured chest radiograph interpretation protocols reduce missed findings by up to 40% compared to unsystematic approaches.
The journey from novice to competent interpreter requires three elements: consistent practice with the same systematic method, understanding normal anatomy thoroughly before studying pathology, and correlating radiographic findings with clinical context. Remember that even experienced radiologists miss approximately 30% of abnormalities on first review—implementing a structured approach protects against cognitive biases like satisfaction of search and anchoring bias.
Whether you’re an MBBS student preparing for clinical rotations, a junior doctor building emergency department skills, or someone seeking to understand medical imaging better, mastering chest x-ray interpretation opens doors to confident clinical decision-making. The ability to recognize life-threatening conditions like tension pneumothorax within seconds, or subtle findings like early pneumonia, directly impacts patient outcomes and builds professional credibility.
Key Takeaways:
- Always use DRS-RIPE for quality assessment before interpretation
- Apply ABCDE systematically every single time
- Compare side-to-side constantly for asymmetry
- Review commonly missed areas (apices, behind heart, below diaphragm)
- Correlate findings with clinical presentation
- Know when to recommend further imaging
Continue your medical education journey with Simply MBBS, where we make complex medical topics accessible for students worldwide. Subscribe to our newsletter at simplymbbs.com for weekly updates on clinical skills, exam preparation strategies, and evidence-based medical knowledge. Master one skill at a time, and watch your clinical confidence soar.
Practice makes permanent—choose your practice method wisely, and your systematic approach to chest X-ray interpretation will become second nature.